Currently Empty: $0.00

How to Choose the Right Foundation Shade for Fair Skin
Finding the right foundation shade is one of the most frustrating parts of building a makeup routine, and it can feel especially tricky for people with fair skin. Fair skin tones often come with subtle undertone differences that are easy to miss, and many foundation lines offer only a limited range of light shades to begin with, which narrows the options even further. Choosing a shade that’s too warm, too pink, too yellow, or simply too dark can leave foundation looking obvious rather than blending seamlessly into the skin. This guide walks through everything you need to know to choose the right foundation shade for fair skin, from identifying your undertone to testing shades properly, understanding formula and finish, and adjusting your approach across seasons, before committing to a full-size product.
Understand the Difference Between Fair Skin and Undertone
Before choosing a shade, it helps to separate two related but different concepts: skin tone and undertone. Skin tone refers to how light or dark your skin appears on the surface, while undertone refers to the subtle color beneath the surface that stays consistent regardless of tanning or seasonal changes. Fair skin can have cool, warm, or neutral undertones, and getting this detail right is often more important than simply picking the lightest shade available.
Cool undertones tend to have pink, red, or bluish hints beneath the skin. Warm undertones lean more yellow, peach, or golden. Neutral undertones are a balanced mix of both, which can sometimes make shade matching a little easier since neutral shades tend to blend well with a wider range of options. Identifying your undertone accurately is the foundation, no pun intended, of finding a shade that actually disappears into your skin rather than sitting on top of it.
It’s worth noting that fair skin is sometimes mistakenly treated as a single, uniform category in makeup marketing, when in reality it spans a wide range of subtle variations. Two people who both describe themselves as fair-skinned can have noticeably different undertones, surface tone, and even the way their skin reflects light, which is exactly why a one-size-fits-all approach to shade selection so often falls short.
Key Points on Skin Tone vs Undertone:
- Skin tone describes lightness or darkness; undertone describes the underlying hue
- Cool undertones often show pink or bluish hints beneath the skin
- Warm undertones typically show yellow, peach, or golden hints
- Neutral undertones are a balanced mix and often easier to match
- Fair skin spans a wide range of undertone variations, not a single uniform category
[Image Placeholder: Diagram comparing cool, warm, and neutral skin undertones]
Simple Ways to Identify Your Undertone at Home
There are a few reliable at-home methods for identifying undertone without needing a professional consultation. One common approach is the vein test: looking at the veins on the inside of your wrist in natural light. Veins that appear more blue or purple often indicate a cool undertone, while veins that look more green suggest a warm undertone. If it’s difficult to tell or the veins appear a mix of both, you likely have a neutral undertone.
Another helpful method is considering how your skin reacts to sun exposure. Skin that tends to burn easily and rarely tans often leans cool, while skin that tans more easily, even if it’s still fair, often leans warm. Jewelry preference can offer a subtle clue as well, since people with cool undertones often find silver jewelry more flattering, while those with warm undertones tend to gravitate toward gold.
A white paper or fabric test can also help. Holding a plain white piece of paper or cloth up against your face in natural light and observing whether your skin appears to have a pink or rosy cast, versus a yellow or golden cast, can offer another data point. Combining two or three of these methods rather than relying on just one tends to give a more reliable overall picture, since no single test is perfectly accurate on its own.
Key Points on Identifying Undertone:
- The vein test compares the color of wrist veins in natural light
- Blue or purple veins often suggest a cool undertone
- Green-toned veins often suggest a warm undertone
- The white paper test compares skin against a neutral background for pink or yellow casts
- Combining multiple methods gives a more reliable overall picture than relying on just one
[Image Placeholder: Person examining wrist veins in natural light for undertone test]
Always Test Foundation Along the Jawline, Not the Hand
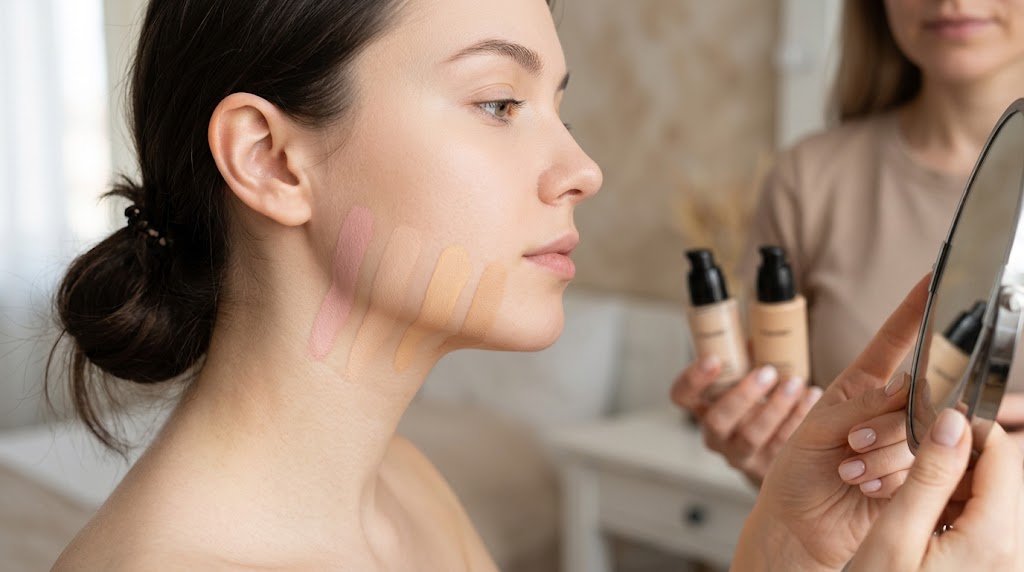
One of the most common mistakes people make when choosing a foundation shade is testing it on the back of the hand instead of the face. Hand skin often differs in tone from facial skin, which can lead to choosing a shade that looks completely different once applied to the face. The most accurate way to test a foundation shade is to apply a small amount along the jawline, blending it slightly into both the face and neck.
The correct shade should essentially disappear into the skin at this blending point, without leaving a visible line between the face and neck. If a shade sits clearly darker or lighter than the surrounding skin, or if it creates a noticeable line, it’s likely not the right match, even if it looked close in the bottle. It’s also worth testing two or three closely related shade options side by side along the jawline at the same time, rather than testing one shade in isolation, since seeing shades in direct comparison often makes subtle differences much easier to spot.
For fair skin specifically, it helps to test shades in an area that includes both the face and a bit of the upper neck or chest, since fair skin can sometimes show a noticeable difference between facial tone, which may see more sun exposure, and the skin on the neck or chest, which is often slightly lighter or cooler in undertone.
Key Points on Proper Testing:
- Test foundation along the jawline, not on the back of the hand
- Blend slightly onto both the face and neck to check for a seamless match
- The correct shade should disappear with no visible line
- Testing two or three shades side by side makes subtle differences easier to spot
- Include the neck or upper chest area in your comparison for fair skin specifically
[Image Placeholder: Foundation swatch being tested along the jawline]
Check the Shade in Multiple Lighting Conditions
Lighting can dramatically change how a foundation shade appears on the skin. A shade that looks perfectly matched under warm indoor store lighting might look noticeably different in natural daylight or under the harsher lighting of a bathroom at home. Before committing to a full-size purchase, it’s worth stepping outside or near a window, if possible, to check how the shade looks in natural light.
Many makeup counters and beauty stores also have daylight-simulating mirrors specifically for this purpose, so it’s worth asking a store associate if one is available. Checking the shade across a few different lighting environments significantly reduces the chances of an unpleasant surprise once you get home. It’s also worth checking how a shade looks under the specific type of lighting you’re most often in during a typical day, whether that’s office fluorescent lighting, home lamp lighting, or outdoor daylight, since the goal is a shade that looks natural in the environments where you’ll actually be seen most often.
Photography lighting, including phone camera flash and video call lighting, can also reveal mismatches that aren’t as obvious in person. If you regularly appear on video calls or in photos, it’s worth briefly checking how a new foundation shade looks on camera before fully committing to it.
Key Points on Lighting Checks:
- Indoor store lighting can distort how a foundation shade actually looks
- Check the applied shade in natural daylight before purchasing
- Ask about daylight-simulating mirrors at makeup counters
- Consider the specific lighting environments you’re in most often day to day
- Check how the shade appears on camera if photos or video calls are a regular part of your routine
[Image Placeholder: Person checking foundation match near a window in natural light]
Look for Brands With a Genuine Range of Fair Shades
Not all foundation brands offer a truly wide range within the fair skin category, and some lines jump too quickly from very light to medium tones, skipping over the subtle in-between shades that many fair-skinned people need. Researching brands known for extensive fair shade ranges, and reading reviews specifically from people with fair skin, can save significant time and money compared to guessing with a limited shade range.
Many beauty brands now offer online shade-matching tools or virtual try-on features that use undertone and skin tone information to suggest a starting point. While these tools aren’t always perfectly accurate, they can narrow down the options before an in-person test, especially when shopping online without access to a physical store. Some brands have also invested in AI-powered shade matching using a photo uploaded through a phone camera, which, while still imperfect, has become noticeably more accurate in recent years and can be a useful starting point before an in-person confirmation.
It’s also worth paying attention to whether a brand offers sample sizes or a shade-matching service in-store, since being able to test a small sample at home across a few days, in your own regular lighting, is often more reliable than a single quick decision made under store lighting during a short visit.
Key Points on Choosing the Right Brand:
- Some brands offer a wider, more nuanced range of fair shades than others
- Read reviews specifically from people with fair skin tones
- Online shade-matching tools can offer a helpful starting point
- AI-powered photo matching tools have become increasingly accurate but aren’t perfect
- Sample sizes let you test a shade at home in your own regular lighting before buying full size
[Image Placeholder: Row of foundation bottles showing a range of fair shade options]
Understanding Foundation Formula and Finish
Shade matching isn’t the only factor that determines how natural a foundation looks on fair skin. The formula and finish of a foundation can significantly affect how a shade appears once applied, sometimes making an otherwise well-matched shade look slightly off. Foundations generally fall into a few broad finish categories: matte, satin or natural, and dewy or luminous, each of which interacts with light differently on the skin.
Fair skin, particularly skin with a cooler undertone, can sometimes appear more washed out under heavy matte formulas, since matte finishes absorb light rather than reflecting it, which can occasionally emphasize paleness in a way that looks flat rather than fresh. A natural or slightly dewy finish often works well for fair skin, since it allows a bit of light reflection that can make the complexion look more alive and healthy rather than one-dimensional.
Formula weight matters too. Fair skin, especially skin prone to dryness or sensitivity, may show texture more visibly under a heavy, full-coverage formula than under a lighter, buildable one. Starting with a lighter coverage formula and building up only where needed, rather than applying a full layer of heavy coverage everywhere, often creates a more natural-looking result on fair skin specifically.
Key Points on Formula and Finish:
- Matte finishes can sometimes make fair skin look flat or washed out
- A natural or slightly dewy finish often complements fair skin well
- Heavier formulas can emphasize texture more visibly on fair, sensitive skin
- Lighter, buildable formulas often create a more natural-looking result
- Formula choice matters alongside shade in achieving a seamless match
[Image Placeholder: Comparison of matte, natural, and dewy foundation finishes]
Account for Seasonal Skin Tone Changes
Fair skin can still shift slightly with the seasons, even for people who don’t tan easily. Winter months often bring slightly paler skin due to less sun exposure, while summer can bring a subtle warming or light tanning, even for fair-skinned individuals who are diligent about sun protection. Keeping this in mind can help explain why a shade that matched perfectly in January might look slightly off by July.
Some people with fair skin choose to keep two closely related shades on hand, one for cooler months and one for slightly warmer months, blending them together during transitional seasons. This approach avoids the need to constantly repurchase foundation while still maintaining an accurate match year-round. A small handheld mixing palette or simply blending two shades directly on the back of the hand before application makes this process quick and easy once you’ve identified your two seasonal shades.
It’s worth rechecking your shade match at the start of each new season, particularly after a summer with more sun exposure than usual, rather than assuming last year’s exact match still applies without any adjustment, since even fair skin that resists tanning can show subtle seasonal shifts over time.
Key Points on Seasonal Adjustments:
- Fair skin can shift slightly paler in winter and warmer in summer
- A shade that matches well in one season may need slight adjustment in another
- Keeping two closely matched shades on hand can help during transitions
- Blending two shades together is a common, practical solution
- Recheck your shade match at the start of each new season rather than assuming it stays constant
[Image Placeholder: Two foundation bottles side by side representing seasonal shade options]
Avoid Common Shade-Matching Mistakes
A few recurring mistakes tend to trip people up when shopping for foundation, regardless of skin tone. Choosing a shade that’s too light in an attempt to appear “fair” rather than matching actual skin tone often results in an unnatural, mask-like appearance, especially where foundation meets the neck. On the other hand, assuming that all fair shades are automatically cool-toned can lead to choosing a shade with the wrong undertone entirely, since fair skin can lean warm or neutral just as often as cool.
Another common mistake is not allowing foundation to oxidize before judging the match. Some foundation formulas shift slightly darker or warmer a few minutes after application as they interact with skin oils. Waiting ten to fifteen minutes after application before making a final judgment on the shade match can prevent an inaccurate first impression, particularly with formulas known to oxidize more noticeably than others.
Skipping a proper skin prep routine before testing foundation is another overlooked mistake. Testing a shade on dry, flaky, or unmoisturized skin can distort how the color and finish actually appear, since foundation can cling to dry patches or apply unevenly. Taking a moment to apply a light moisturizer and letting it fully absorb before testing a new shade gives a much more accurate picture of how that foundation will look during normal daily wear.
Key Points on Avoiding Mistakes:
- Don’t choose a shade lighter than your actual skin tone for a “fairer” look
- Fair skin doesn’t automatically mean a cool undertone
- Allow foundation to oxidize for ten to fifteen minutes before judging the match
- Test on properly moisturized skin rather than dry or unprepped skin
- Reassess the shade after it has fully settled into the skin
[Image Placeholder: Before and after comparison of foundation oxidizing on skin]
When to Consider Professional Shade Matching
While at-home testing methods work well for most people, some situations call for a bit of extra help. If you’ve tried several shades and undertones without finding a satisfying match, or if you’re preparing for a specific event like a wedding where getting the shade exactly right matters more than usual, booking a professional shade-matching consultation at a beauty counter or with a makeup artist can be worth the time.
A trained makeup artist can often identify subtle undertone and finish issues more quickly than trial and error alone, and many beauty counters offer this service free of charge, particularly if you’re open to purchasing the product afterward. Bringing a photo of your skin in natural, unfiltered lighting can also help a professional understand your typical skin appearance beyond how it looks under the store’s specific lighting that day.
For particularly hard-to-match fair skin, some professionals also recommend custom-blended foundation services, offered by select brands, which allow for a shade mixed specifically to match your exact skin tone and undertone rather than choosing from a fixed range of pre-made shades.
Key Points on Professional Shade Matching:
- Consider professional consultation if repeated at-home attempts haven’t worked
- Many beauty counters offer free shade matching, especially with a planned purchase
- Bring a natural-light photo to help a professional understand your typical skin tone
- Custom-blended foundation services exist for particularly hard-to-match skin
- Professional input can save time and money compared to continued trial and error
[Image Placeholder: Makeup artist helping a client find a matching foundation shade]
Final Thoughts
Choosing the right foundation shade for fair skin comes down to understanding both your skin tone and undertone, then testing shades properly rather than relying on guesswork or in-store lighting alone. Taking the time to test along the jawline, check the match in natural daylight, and choose brands with a genuine range of fair shades makes a significant difference in achieving a natural, seamless finish. Understanding how formula and finish interact with fair skin, adjusting your shade slightly across seasons, and knowing when professional help might be worth seeking out rounds out a more complete, reliable approach to shade matching.
With a bit of patience and the right testing approach, finding a foundation shade that truly matches fair skin becomes a much simpler and more reliable process, one that leaves your complexion looking naturally even rather than visibly made up.